Sunday, April 29, 2012

10 Years and 10 Days Ago...

...I married my best friend. Literally!  We meant in college in the summer of 1992 and at first, I didn't like him.  Don't get me wrong, I thought he was cute, but he was cocky and thought he knew more than everyone else---in my opinion, anyway.   We butted heads.  Then one day, we started talking, just the 2 of us and I thought he was easy to talk to a much different on a one on one basis.  Freshman year started and we were inseperable...we were the best of friends and even referred to each other as "confidant".
On April 19, 1994, our Sophomore year, we went from best friends to boyfriend and girlfriend.  Everyone thought we were a couple anyway, so it was no surprise.  We survived college and a long distant relationship and decided to move in together in August, 1998.   In November 1999, he asked me to marry him and we became husband and wife on our 8th anniversary, April 19, 2002. 


We have been married for 10 years,  together for 18 years.  That's almost half our lives!!  It has been a crazy rollercoaster ride.  We've had our good times and bad, we're making it through parenthood and dual careers, but through it all, we still have each other. 


Thursday, April 26, 2012

Upcoming Class

I'm teaching this mini album class featuring Creative Imaginations Devotion line and Basically Bare's Polly's Pocket mini album at the National Scrapbook Day Crop in Trumbull, CT.  For more check out the Divas Scrapbookers of Connecticut page on facebook.

Beautiful Mini Album Class
when: May 19th
 cost: $35.00
time: 3 hours
Max # of students: 20


Monday, April 23, 2012

Purple Cows Blog Hop

Hello and welcome to Purple Cow's blog hop!!   If you've hopped here from  Elisa's fabulous blog, then you are well on your way and will continue to be treated to some wonderful eye candy from our terrific DT members!!

 If you just happened to pop in on my blog, please join us...I guarantee you'll have a great time and gain a ton of inspiration. Just go back Purple Cows' blog and start from there. Be sure to leave comments on each blog and make it all the way to the end of the hop for a chance to win some great RAKs from Purple Cows!!! How fab is that?

Purple Cows has some terrific new tools in the CraftGeek line and tomorrow April 24th HSN will have the Pin It, Wind It and Punch It featured during the following show times  12am, 8am, 1pm, 2pm and 9pm EST. We hope that you will turn to HSN or go to their site and pick up your favorites as HSN will have them for an unbeatable deal.

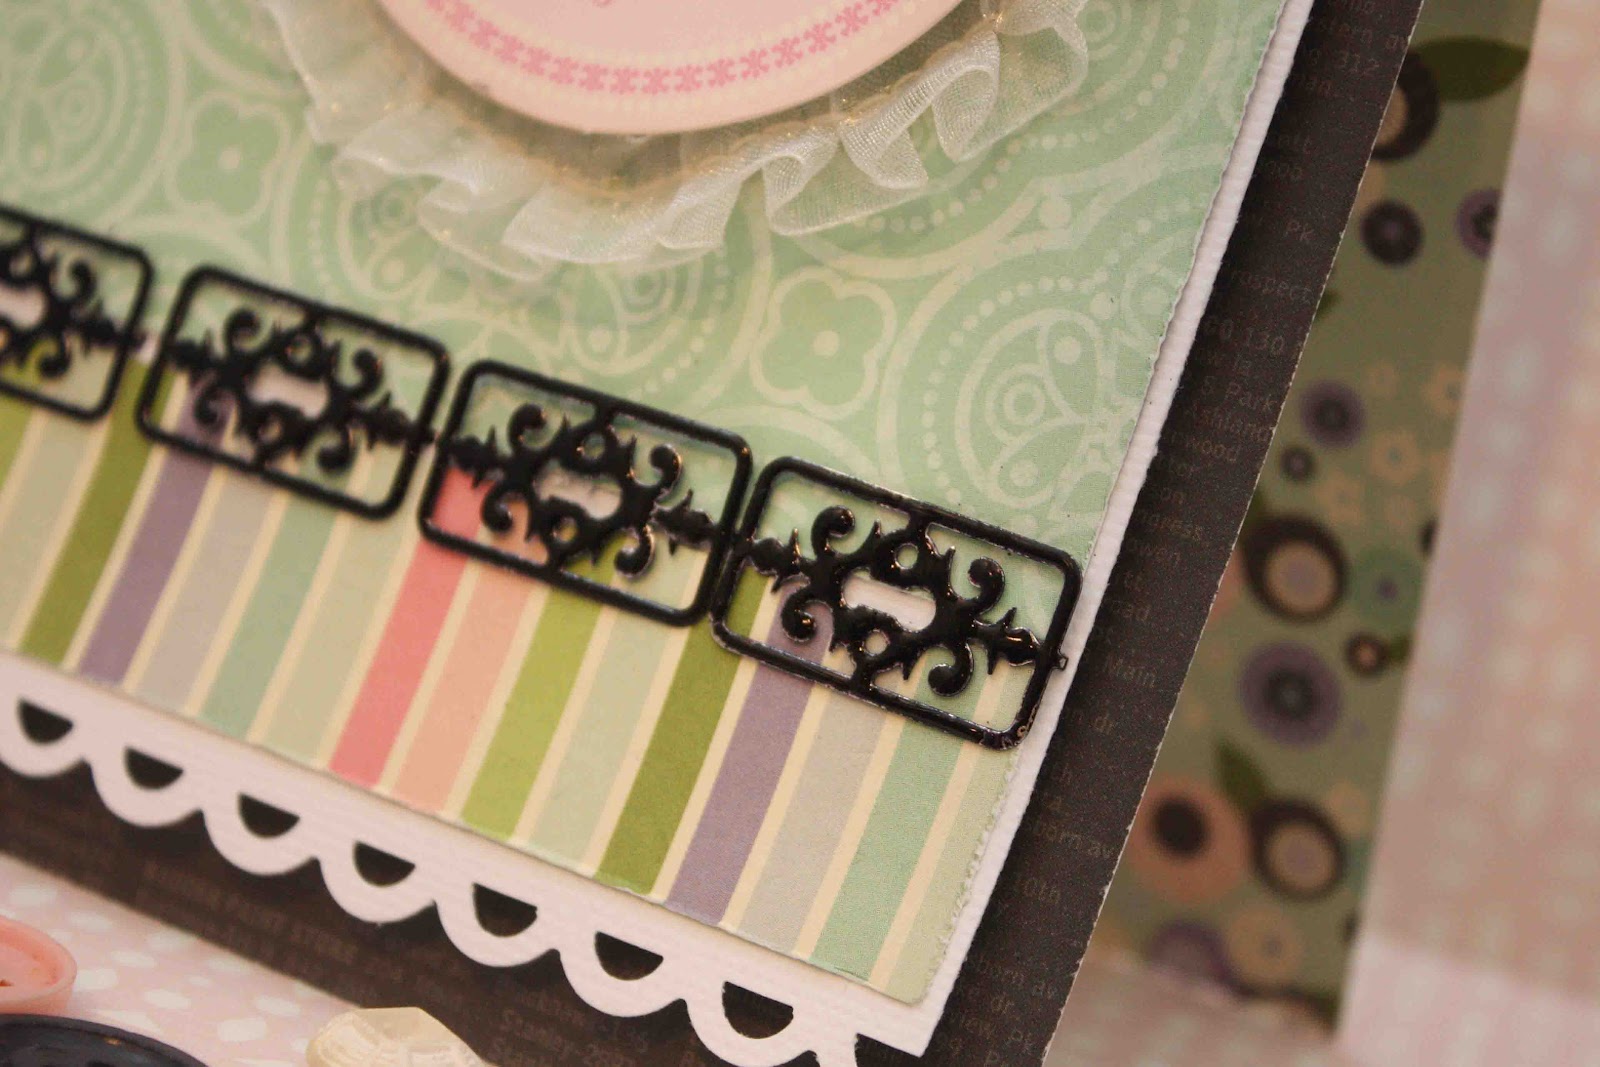
I used the CraftGeek Pin It on my card.  I created a border along the bottom of my card.  Before I attached the pins, I heat embossed them to change up the color.  As you can see in my photos below, it's a very simple process.  Heat embossing allows you to change the pins into any color of your choice. 


 I started by inking the pin to give the powder something to stick to.


I heated until the powder melted to a shiny gloss.


Here are the before (silver) and after (black)


Then I used the pin it to attach my pins.  The magnetic plate helps keep the tool properly positioned while the see through plate allows you to see exactly where you want to apply your pin.  Love that!!


Here's a close-up of the pins.


To get in on the fun and be entered into the drawing for some amazing Purple Cows tools. Be sure to leave a comment on all the designer blogs as well as the Purple Cows blog. Follow us or become a Fan on Facebook if you aren't already and share the hop info with your friends by sending them our way or sharing the Purple Cows Hop on your facebook page.

We will be giving out the following 7 prizes: 

1. Punch It Autumn
2. Punch It Solstice
3. Punch It Summer
4. Punch It Spring
5. Punch it Winter
6. Wind It and wire
7. Pin It and assorted pins
Now hop your way over to Dawn's awesome blog!! 

Here's the blog hop order just in case you need it:


Have fun!!  Later!

Saturday, April 21, 2012

Quick Quotes - Framed

Good day again blog readers!!  I'm back again with another project using Quick Quotes Club Q kits.  The other day, my older son and I took these fun photos in a booth at the mall.  I knew immediately that I had to use them on a project.  I decided to frame this layout so that I could hang it in a special place in my scrap room.  My son and I always have such fun silly times together and I definietly want to remember these times.
I started the project by inking one of my favorite stamps with Blue Hawaaiian PowderPuff Chalking Ink and stamping on the background.   I created a grid by cutting down some of the papers and one of the quotes from the kit and aligning them alongside my photos.  I think the sleek simple lines really allow the quote and photos stand out.  I layered the patterned papers with pieces of the vellum quote from the kit to highlight a few descriptive words that matches my son's personalitiy and my feelings about him.


I used some thickers on this layout, however the color was much lighter than I wanted, so I simply inked them to match.   

This project took mere minutes to create thanks to the Club Q kit.  I didn't have to think about coordinating because everything was put together for me.  Love that!!

Thanks for stopping by today!!

Sunday, April 15, 2012

Altered Canvas

Hey there Quick Quotes blog readers!! Tanisha here with another project featuring products from Club Q, Quick Quotes' monthly kit club and the Best Traditions vellum strip. What I love most about this kit is that it comes with a photo of a pre-made projects. You can either use that as a guide or do like I did here and create create a freestyle project of your own! Very versatile, right?!

I used the canvas to create a wall hanging for my scrap room to serve as a reminder as to my main reason for creating. I love these colors, they're so regal (and were my high school colors).
Here are a few highlights of the project. I stacked 2 die cut flowers and then a twine tied button to the center.
I absolutely adore the rhinestone trim, so I used it to frame the canvas so that it would stand apart from the scalloped die cut that I adhered to the back. I also stacked the die cut buttons and added pearls because...well I just love butterflies and add them to many of my projects. :)

Then, I added some purple to the flower by spritzing it with spray mist and then inking it with Purple Passion PowderPuff Chalking Ink.
I heat embossed the background with white embossing powder and a music print stamp. I inked over it with Lemonade and Purple Passion PowderPuff Chalking Inks and then used a damp paper towel to wipe off the excess.
That's all from me today...thanks for stopping by!

Blog Widget by LinkWithin

My photo
I live in New Jersey with my husband and our 2 sons. I work full time as a Medical Technologist and volunteer for the Community Emergency Response Team in my town. I've been scrapping for the past 8 years and I truly love it because it allows me to combine my love of photography and my love of paper into one art form. I love teaching scrapbook classes and providing freelance work. Please contact me via email if you are interested in commissioning my services: tanisharenee74@hotmail.com

All content, including text, photographs, and artwork are copyright 2011 by Tanisha R. Long (except where noted). My original artwork is shared for personal inspiration only, not for commercial use. This includes contests, submissions, and publications. Any other use requires my expressed written consent.
MyFreeCopyright.com Registered & Protected

My Favorite Projects

Twitter


FEEDJIT Live Traffic Feed

Blog Archive

Labels