Showing posts with label helmar USA. Show all posts

Saturday, March 5, 2011

Scrapbooking & Beyond Pubs

Scrapbooking & Beyond Magazine has a new four part series called "Gadget Girls" where 4 designers (Liz Qualman, Pam Callaghan, Robbie Herring, and me) each create a layout using a specific tool. We each rocked out the i-rock tool by Imaginisce in the Spring issue.

We all know how much I love bling and getting to work with this tool was a lot fun!! The i-rock was really easy to work with, too. I used the frames stencil to create the scalloped border, glam rocks in rhinestuds, and hot rocks compacts in jewels on this layout.


supplies used: patterned paper- Bo Bunny; i-rock- Imaginisce; flowers- Petaloo; sticker- Creative Imaginations; rub-on- Karen Foster; Ink- Clearsnap; stickles- Ranger; Adhesive- Helmar; punches- EK Success; trimmer- Purple Cows

Enter Scrapbooking & Beyond Magazine's drawing for a chance to win YOUR VERY OWN i-rock tool, plus 3 stencil kits, 3 hot rocks compacts, and a handy dandy tote bag. Just head over to their website and fill out an entry form!!

This next layout was also published in the same magazine. It's the first time I've ever had more than one project in any given publication!! So exciting!!

The photos are of Xander when he was 10 days old.


supplies: patterned paper, rub-ons, stickers, wood veneer- Creative Imaginations; flowers- Petaloo; ink- Clearsnap; punches- Martha Stewart, Marvy Uchida; adhesives- Helmar; trimmer- Purple Cows

Thanks for stopping by the blog today!!

Monday, December 6, 2010

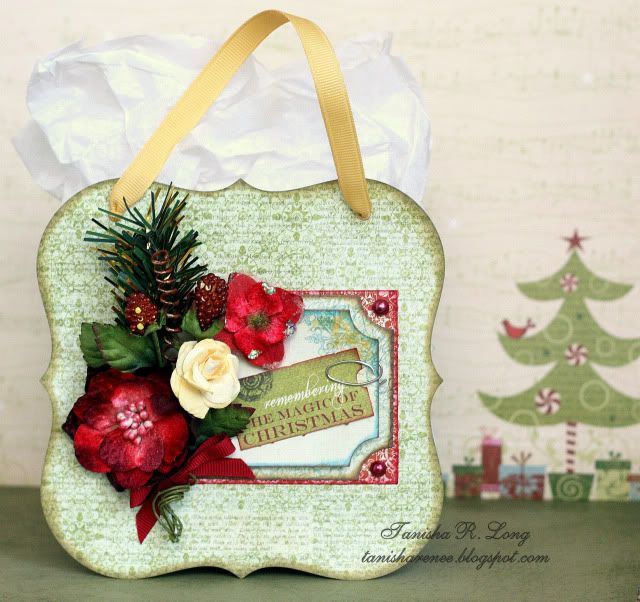
Christmas Gift Bag

It's that time of year when many of us go out to search for the perfect gifts to give to our friends and loved ones. Once you find that perfect gift, what better way to present it than in a stunning handmade gift bag?!

Happy Monday everyone!! I am so thrilled to present my first project as a member of Cheery Lynn Designs DT to you today.

I created this gift bag using 2 different sets of nested dies: French Flair and Coved Rectangle


I started by using the largest French Flair Die to cut 2 panels from Pink Paislee Father Christmas 6x6 paper pack with my Epic Six die cut machine. I inked the edges and then set aside.


Next, I cut a 12"x 3 1/2" strip from patterned paper (Father Christmas) and scored 1/2" from the edges of the long ends and 4" from the shorter ends and then folded, as shown. NOTE: I wanted this to be wide so I could fit a size present in it, but you can vary it to fit your needs. Just cut the strip 1" wider than you need because you're going to need to score 1/2" on each side to attach the panels.


I folded the strip, as shown and used Helmar Premium Craft glue on the corners. I used the paper clips just to hold it in position, once dried, I removed them.

I adhered the folded strip to one of the panels, a little closer to the bottom to leave room to punch holes at the top for the handles.

I adhered the second panel to the strip and ensured that the bag was straight before the glue dried completely.

Next, I die cut 2 panels using the 2nd and 3rd largest Coved Rectangles. I inked the edges and then layered them using foam Zapdots for dimension. I matted the layered piece with a piece of inked red patterned paper and then adhered to the front of the gift bag about 1/2" from the right side.

Finally, I decorated the bag with Petaloo Chantilly flowers and a Canterbury pick, a paperclip, pearls, and a die cut sentiment from Father Christmas. I punched holes in the top and used ribbon to create the handles.

Here's a close up of the front
.
supplies: patterned paper, die cut- Pink Paislee; flowers- Petaloo; ink- Clearsnap; ribbon- Savvynsassy; dies- Cheery Lynn Designs;Pearls- Want 2 Scrap; adhesive- Helmar; paperclip

Thanks so much for stopping by the blog today. I hope this project has inspired you to make one of your own for any occasion! They are super easy and FUN! Be sure to check out Cheery Lynn Designs blog everyday to see what our amazing DT is up to!!

Until next post...have a scrappy day!


Friday, October 29, 2010

EEEEEKKKKKK!!!!!

It's almost Halloween...it's almost Halloween!!!

I love Halloween!! It's always been at the top of my list of fun holidays and now that I have children, I really get into it! I dress up with the kids and take them trick-or-treating and to whatever other fun events that I find in our area. I haven't gone as far as decorating my house yet, but I have a feeling that I will next year!

Last weekend, I took the boys on a hayride and pumpkin picking as part of our Fall tradition. We searched and searched for the perfect pumpkin to carve. I've never carved a pumpkin before (I know shocking, right?), but I treated it like a scrapbooking project and this is how it turned out. Really cute for my first try, right? It originally had 6 teeth, but I accidentally knocked out 3 of them as I wiped away some of the excess guts.


Today, I need to put on my endurance shoes and my patient panties, along with my witches' hat because the boys and I are going to 3 parties! That's a lot of running around...and a lot of kids all hyped up on sugar, mine included!! LOL!!

Not only is Halloween one of my favorite holidays, it's also one that I love making crafts for!! I swear I buy as many Halloween products and I do Christmas products.

I made these little pumpkin treat holders for Donovan to give to his classmates today. Each pumpkin houses a bag of chocolate covered pretzels...our fave!! YUMMY! I used my cricut to cut the eyes and freestyled the mouth.


Here are a couple more that I made for Purple Cows using the 2-in-1 trimmer and the straight and scoring blades. You can decorate them using cardstock, as I did in the previous photo or patterned paper as seen here. These are so versatile, just change up the colors to create your favorite ghouls (see the little Frankenstein in the back?). For complete instructions to recreate these treat holders, chick HERE.


I recently made this LO featuring Xander last Halloween for Creative Imaginations using Samantha Walker's new Harvest line. He was all decked out in his little Frankenstein costume that once belonged to his big brother. Isn't he adorable?

For complete instructions to recreate this layout, click HERE.


This final project is not a Halloween project, but it features my 2 favorite little ghouls in the whole wide world!!


I created this for gonescrapbooking/examiner.com. Here some close-up of the details and those fabulous My Mind's Eye products.


Thanks so much for stopping by the blog today! I hope these Halloween projects have inspired you to dig in your Halloween stash.

Have a safe and HAPPY HALLOWEEN!!! Don't forget to check back on Monday for a "hair raising" giveaway!

Sunday, October 17, 2010

Helmar Halloween Howler Blog Hop

Welcome to Helmar's Halloween Howler Blog Hop!!! If you've just hopped in from the very talented Gayle's blog, then you've made it halfway through and are well on your way! If you just happened upon my blog and want to join in on the fun, we're more than happy to have you along. Just go back and start at Helmar's blog and make your way to the end. There are tons of prizes at stake, so be sure you leave comments on all of the blogs along the way.

I am featuring Helmar Foam Zapdots and Helmar Professional Acid Free Glue on my projects. I love the levels of dimension that the zapdots allow me to achieve. The acid free glue is specially made for book binding and doesn't leave my projects feeling stiff.

I traced one of the the ghost pages from a Nikki Sivils chipboard album to create this Happy Howl-O-Ween card. I inked strips of white cardstock and used Professional Acid Free glue to randomly place them across the card. I used foam Zapdots on a few of the strips to add dimension.


supplies: cardstock- American Crafts; ink- Clearsnap; rub-on- Melissa Frances; googlie eyes- Nicole Craft; Adhesive- Helmar Professional Acid Free Glue, Helmar Zapdots

For this Frankenstein card, I used foam Zapdots to pop up the eyelids and nose for dimension. To create the hair, I used Martha Stewart's icicle punch and black cardstock.

Inside of the card reads: "Wishing You A Monster-rific Halloween".


supplies: Cardstock- Worldwin, Bazzill, American Crafts; stickles- Ranger; border punch- Martha Stewart, ink- clearsnap; silver paper- Creative Imaginations; Adhesive- Helmar Professional Acid Free Glue, Helmar Zapdots

This last project was created for one of Helmar's Preferred Partners, Purple Cows. I used the 2-in-1 trimmer along with Partner Products from Cosmo Cricket, Clear Scraps, Clearsnap, magic mesh to scrap these photos of my son from last Halloween.

I used more foam zapdots to give the bat a little lift.

I even added in a little 450 Quick Dry--it's perfect for adhering acrylic elements.

supplies: patterned paper, stickers- Cosmo Cricket; acrylic frame- Clear Scraps; ink- Clearsnap; mesh- Magic Mesh; pen- Marvy; trimmer- Purple Cows; Adhesive- Helmar Zapdots, Helmar 450 Quick Dry, Helmar Professional Acid Free Glue

Thank you so much for joining the blog hop!! I hope all of the projects featured will inspire your creativity! Just click on the arrow below to be taken to Amy's fabulous blog!

Photo Hop

Monday, October 4, 2010

Two Scrapbook Layouts and Two Cards

Fall has officially arrived here in New Jersey. Believe it or not, I had to turn the heat on yesterday. All of the rain we've received has really cooled things down. The temperature in my house was hovering around 62 degrees, which is way too cold for my blood. I like it around 68...maybe 70...not too hot and definitely not too cold. I love Fall because of the beautiful color palette, but I'm still not completely ready to let go of the warm weather, so I'm hopeful for a few more 70 degree days.

One thing I do enjoy about the colder weather is getting to stay inside to do what I love most...scrapbook!!! All of the beautiful colors of Fall inspired the colors on this layout that I created for Helmar Adhesives, using Premium Craft Glue.

Premium Craft Glue is one of my "go to" Helmar Products, especially when I'm creating a project like the one below, where I've used thin strips of paper, borders, and ribbon. I use Premium Craft Glue on everything and I don't have to worry about it oozing out, causing a sticky, glue-y mess. It adheres ribbon perfectly...I couldn't ask for a more versatile adhesive!! I used Quick-Fix Permanent Adhesive Runner, another of my faves, to adhere my photos.

All of the products used here (except gems and bull clip) are from Preferred Partner, Jillibean Soup. I love how easily these products go together and how well they accentuate the photos of my little "Professor", a nickname give to him by my mother-in-law.

I took these photos of Donovan in his Kindergarten classroom on the day of his graduation.

This layout was created using a PageMap sketch.


This All About Me layout was created for gonescrapbooking/examiner.com. I love using lots of patterned paper on my layouts, but I wanted to keep this one simple since there was a lot of journaling. The circle design helped me to achieve both. I was able to include 16 different patterns (18 if you count the die-cuts) without overwhelming the page. To read the journaling click here. I mixed quite a few October Afternoon lines with some from The Girl's Paperie and I love the turn out.

The photo is a self-portrait taken 2 months ago on my 36th birthday.

A few other things that I love about cooler weather: eating creamy tomato soup from Panera Bread (which I had for lunch today), drinking yummy flavored teas and hot chocolate, pulling out my favorite sweaters, and scrapping winter events which usually means including my favorite color, blue!

I made this card for gonescrapbooking/examiner.com using Petaloo's new reindeer dazzlers and glittered paper. I created the "snowy" background by embossing the cardstock...love my epic six!!

And finally...a card I created just because!! I'm getting a head start on my Christmas cards this year..YAY!! These sweet little papers are from Creative Imaginations new Polar Express collection. I recently created a layout of Xander during his first Christmas season and I can't wait to share it with you!

I hope wherever you are in the world that you are staying warm and dry and taking the time to scrap those memories!!

Thanks for stopping by my blog! Until next post...happy scrapping!
Tuesday, September 21, 2010

DT Projects Plus An Easy Technique

Good Tuesday morning everyone!!

Today, I want to share a couple of Design Team projects, including a quick and easy technique showing you how to add glittered polka dots to any of your projects, using Helmar Zapdots. Who doesn't live polka dots, right?

First up is a project featuring my 2 boys, Donovan and Xander, that I created for gonescrapbooking/examiner.com. I mixed products from several Pink Paislee and Basic Grey lines to create this layout.

journaling:
Sometimes being a brother is better than being a superhero. - Marc Brown

No matter which direction life takes you in, always remember to look after one another. Stick together and you can help each other through life's many obstacles. 9.7.10

Align CenterSome detail close-ups


Next, I created my card using Preferred Partner Products from Lily Bee Design, Clearsnap, PK Glitz, Hambly, and Maya Road, along with Helmar Zapdots and Professional Acid Free Glue.

092010 002

1. I Started by randomly placing the zapdots on my card.

092010 006

2. I sprinkled glitter over the zapdots and then tapped off the excess.

092010 009

3. The glitter adheres really well to the zapdots.

092010 007

4. Tip: I heated the zapdots, as if embossing them, so that the glitter doesn't fall off over time.

092010 008

Here's the finished project.

Givethankscard

Thanks so much for stopping by the the blog today!! Happy scrapping!


Blog Widget by LinkWithin

My photo
I live in New Jersey with my husband and our 2 sons. I work full time as a Medical Technologist and volunteer for the Community Emergency Response Team in my town. I've been scrapping for the past 8 years and I truly love it because it allows me to combine my love of photography and my love of paper into one art form. I love teaching scrapbook classes and providing freelance work. Please contact me via email if you are interested in commissioning my services: tanisharenee74@hotmail.com

All content, including text, photographs, and artwork are copyright 2011 by Tanisha R. Long (except where noted). My original artwork is shared for personal inspiration only, not for commercial use. This includes contests, submissions, and publications. Any other use requires my expressed written consent.
MyFreeCopyright.com Registered & Protected

My Favorite Projects

Twitter


FEEDJIT Live Traffic Feed

Blog Archive

Labels